


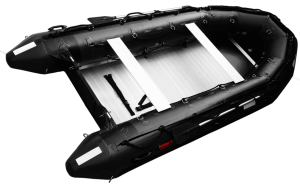

What you should know before you buy an inflatable boat
The following is a direct quote taken from the Transport Canada website: Buying a Boat (section)
Buying a New Pleasure Craft
If you are buying a new inflatable boat in Canada, make sure it has a Hull Serial Number (HIN). If the boat has a motor or is designed to have one, make sure it also has a Transport Canada compliance notice.
Manufacturers and importers must place a HIN and compliance notice (if needed) on every boat they sell in Canada after demonstrating that it meets the construction standards. If you see a new boat for sale that does not have the required HIN and compliance notice, ask the seller to get them for you before you buy.
Remember: A Transport Canada compliance notice means that the boat met the construction standards at the time it was built. Once you own the boat, you must make sure it is up to standard when you are on the water – so get all the facts before you buy.
How do I find and repair air leaks?
If you are losing air pressure, (aside from pressure loss commonly caused by colder temperatures), check the boat over for leaks. Start by checking the valves first. The best tool to find leaks is soapy water in a spray bottle. A leaky valve is rare, but if you do find a leak we can send you a replacement valve. We recommend mixing soap and water in a spray bottle. Spray around the valve. If you see bubbles forming, check your valve fitting and base and be sure the valve insert is screwed on tight. You can apply glue from the repair kit to seal small leaks around the valve or holes where the nylon string enters the valve assembly. If you continue to have problems with the valve, it’s probably time to order a new one.
To find tiny leaks, take the floor boards out, fully inflate the boat until it’s hard to the touch. Put some liquid detergent in a bucket of water and scrub it all over the boat with rag or big wash brush. Watch for elusive or tiny bubbles. When you find the first leak, keep looking. You might as well fix them all at the same time! Remember, the number one cause of slow leaks is due to poorly fitted valves. Unscrew the valve and clean the area. Make sure the little rubber O-rings are still good. They are the cheapest repair possible.
If you have no luck finding a slow leak with air bubbles, inflate the boat to it’s maximum air pressure and try to listen for the leak. If you can narrow the area down, return with a spray bottle to identify the source of the leak.
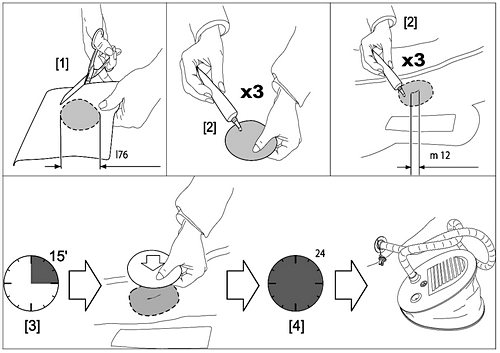
Punctures less than 1/8″ in size can be repaired simply without a patch. Deflate your boat, then clean and dry the area to be repaired. Apply a small drop of glue to cover the puncture and let dry for 12 hours. If you need to get on the water sooner, let dry for 30 minutes and then inflate the boat, inflating the compartment with the repair only 3/4 full. This repair might not be permanent so add a drop again at a later date to make it permanent.
Your Inflatable Boat comes with a repair kit as standard equipment. It is recommended to do repairs in dry weather. Humidity will decrease glue bond. Cut a piece of repair material large enough to overlap the damaged area by approximately 1″ and round off the edges. Apply glue to the under side of the patch and around the area to be repaired. Too much glue will often interfere with a proper repair. Allow adhesive to become tacky for 5 minutes, and then place patch on the damaged area. Use a weight to apply 3-5 lbs. of pressure for 24 hours. After the patch has dried, apply glue around the edges for a complete seal (dry 6 hours).
What to do if air compartments become soft over time?
All inflatable products, including dinghies, kayaks and rafts are tested at our factory. They are kept fully inflated for 48 hours. Therefore, it is extremely unlikely that brand new inflatable products are leaking air right out of the box. If air is escaping rapidly from a valve when you inflate your product for the first time, then most likely you are not properly locking the air valve.
If you leave your boat fully inflated, come back in a couple of weeks and the air chambers are soft, then there are two possible reasons for this besides a temperature drop; the least likely reason for a slow air leak is a micro hole, and most likely is a slow valve leak.
If you suspect that a valve is the source of the slow leak, you can verify this by fully inflating the air chamber, closing the valve cover and applying a soapy water mixture around the valve housing and cover cap. Air may escape around the valve perimeter, cap perimeter, or in the place where the string securing the valve cover cap enters the valve housing.
Over time, it is possible that debris, sand, dirt, oils and grime will accumulate on the rubber seal ring that is designed to keep the valve air tight. That may allow a small amount of air to slowly escape, making the tube and chambers soft. To remove debris you will need to blow air into the open valve with a hand pump while keeping the hose slightly away from valve’s unlocked pushpin. It might be also possible to splash a bit of acetone inside the valve to clean off the dirt and grime. Leave the valve open to let the acetone evaporate. If that does not help, remove the valve with a special valve tool, clean the rubber seal with a cotton swab soaked in acetone and re-install the valve with a tight fit. If that does not help, then valve needs to be replaced.
If you are observing air bubbles around the valve housing perimeter while applying a soapy mixture, there is a possibility that the valve needs to be tightened with a specialized valve tool.
You can also quickly seal the slowly leaking air valve by applying a thin layer of glue around the valve housing perimeter, or putting a drop of glue inside the opening, where the string that secures the valve cover enters the valve housing, if you observe air bubbles at that particular place. Household silicone sealant may also be applied in place of the glue.
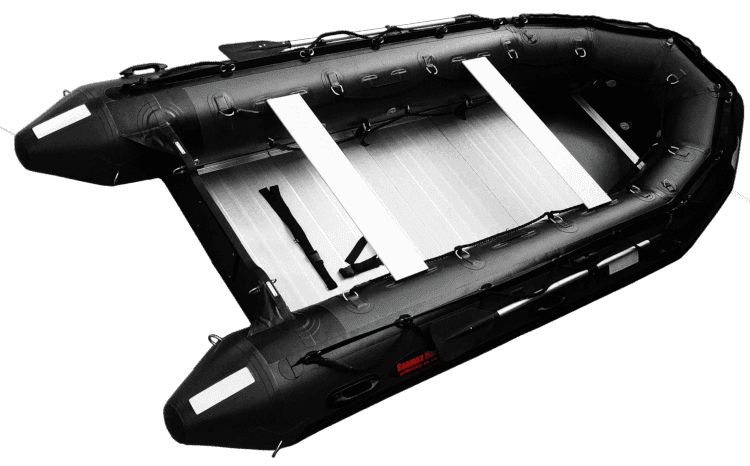
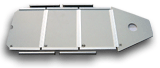
What are the differences between air and plywood floors?
Once inflated, a high pressure air floor becomes as rigid as a plywood floor. You can stand, walk or even jump on it, the same way you could on plywood floor.
If you are planning to inflate and deflate your boat often, then the air floor is your best solution, because the boat folds compactly. It’s a breeze to assemble and inflatable boats with air floor. Just roll out-and inflate.
Assembling a plywood floor is a little bit of a hassle, and therefore we recommend plywood floors only if you keep the boat inflated most of the time. Another advantage of an air floor is that it is much lighter then a plywood floor. Due to it’s lighter weight, the boat can achieve a higher speed much easier then with a plywood floor. Plus, an air floor is easy on your knees and absorbs vibrations better then a plywood floor. Because of these outstanding features, most of our customers prefer boats with air floors.
All of our air floors come with a plywood support above the keel in the bow section of the boat. Because of these patented features, air floors become very rigid and flat. Flat floors perform much better then bended air floors of some competing brands.


How to choose a right boat?
It is much easier to inflate and deflate boats with high-pressure air deck floors than boats with plywood floors or hard floors. It takes more time and skill to assemble plywood floor. In general, if you are planning to inflate/deflate the boat often, then select a boat with an air floor. If you keep the boat fully inflated for at least 1-3 weeks then choose a boat a with plywood or hard floor. If you keep boat on a trailer or in a dock, then a hard floor will not be a problem for you. If you keep the boat in the car’s trunk and inflate it for only a day of fishing, then you will find it easier to deal with an air deck floor.
How PVC fabric compares to Hypalon?
There are two main types of fabric that most inflatable boats are made of. They are either PVC or Hypalon. Most Mercury, Sea Eagle and Zodiac inflatable boats are made of PVC. Caribe, AB and Achilles inflatable boats are made of Hypalon.
PVC
Pro – Significantly less expensive then Hypalon.
Con – Won’t last as long in the direct sunlight as Hypalon before it starts to fade out (if left unprotected). Does not tolerate sunscreen and insect repellent as well as Hypalon.
Hypalon
Pro – Will last significantly longer than PVC when exposed to prolonged periods of direct sunlight. Will tolerate fuel spills, sunscreen, insect repellent, and exhaust fumes better than PVC.
Con – Significantly more expensive then PVC.
In general PVC fabric won’t last as long as Hypalon fabric if the boat will be subjected to prolonged periods of direct sunlight and no measures have been taken to protect the PVC fabric from the sun (i.e. boat cover or UV protectant). After a number of years in direct sunlight the PVC fabric will become sticky and fade out.
Exposure of PVC inflatable boat to direct sunlight is not a problem unless your boat is going to be outside and unprotected all year long. If you only use the boat occasionally such as on weekends or while on vacation then it isn’t a factor at all. Even if you leave your boat outside all the time the issue can be solved simply by putting a boat cover or piece of tarp over your boat when it is not in use.
How to assemble Plywood or Aluminum Floors?
Please visit the Hard Floor Assembly page if you have difficulties installing your plywood floor into your inflatable boat.
What to do if boat gets accidentally punctured while on the water?
First of all – do not panic. Inflatable boats have several air chambers, and if one of chambers gets punctured, the boat will stay afloat due to the buoyancy of the remaining air chambers.
We suggest that you always carry on board the following items – Personal Flotation Device (PFD) for each passenger along with a whistle, a marine emergency radio to call the Coast Guard for help if necessary, a hand pump, piece of duct tape (Gorilla Tape) and a small bottle of acetone.
If boat gets punctured below the water line, there is nothing much you can do except for pumping air with a hand pump in order to slow down the air leak. For quick emergency repairs in ripped inflatables, you can purchase a ClamSeal.
Punctures in accessible places, inside the boat, can be temporarily fixed with a piece of duct or Gorilla tape. To insure a good seal, the area around the puncture should be cleaned with acetone before applying duct tape. After that, you can pump in air to slow down the escaping air, and get ashore as soon as possible.
How long should I expect my inflatable boat to last?
That is totally up to you. If you take good care of your boat, it may last 5-10 years. If you do not take proper care of the boat, it will only last up to its warranty period. However, abused and mishandled boats are not covered by the warranty.
To extend the lifetime of your boat by taking proper care of it, we are recommending following book: “INFLATABLE BOATS – Selection, Care, Repair, and Seamanship” by Jim Trefethen. ISBN number 0-07-065252-X. Available at www.amazon.com, or you may order it from the publisher: The McGraw-Hill Companies, 1-800-262-4729.
It is well known that the most common reason for premature boat aging is exposure to the sun and its damaging UV rays. Fabric discoloration, fading, breakdowns and damages to varnished plywood can be all attributed to direct sun exposure.
The solution is simple – when the boat is not in use, cover it or fold and store away.
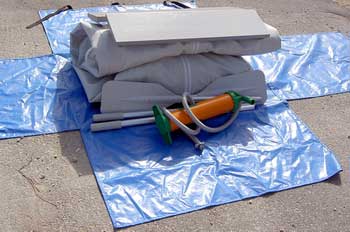
Folding Inflatable Boats
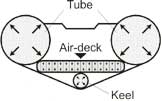
Your boat has several separate air chambers and valves. First of all open all of valves by depressing them and turning a quarter turn.
Use a vacuum cleaner or a 12-volt electric pump to deflate the inflatable keel. Close the valve and install the valve protector cap.
If your boat is equipped with an Plywood or Aluminum Floor, it is now time to remove it. Remove the “stringers” from either edge first. Now, lift the floor about 10 inches at the rear most seam (between the last and second last floor pieces). Carefully lift the pieces out and place them in their carrying case.
If your boat is equipped with a High Pressure Air deck Floor, remove the air from it and install the valve protector cap. It is not necessary to remove the floor from the boat unless you wish to clean the boat at this time.
The valves should be in their “open” position for disassembly. They are open when they are in the “down” position. They can be alternately placed in their up (closed) and down (open) positions by pushing them down and turning one quarter turn.
Deflate the main pontoons
There are plenty of Inflatables rotting under the damaging sun in any local marine or harbor. If possible, deflate the boat, clean it and store it in its carry bag.


If the boat is constantly dragged behind your sailboat, left year round on a dock, or left dirty and directly under harmful UV-rays, you can’t expect it to last forever. If you use a boat cover, or at least cover boat with a piece of tarp, your boat will last much longer.
Cleaning Your Inflatable Boat
Try to keep the boat clean and free of chemical detergents and sun screen lotions that may discolor the fabric. We highly recommend boat cleaners available at the Inland Marine USA web site.
Please use ONLY cleaning solutions that are approved for PVC fabrics. For example Inflatable Boat Cleaner from NauticalEase or Cape Ann Inflatable Boat Protector from Inland Marine. Do not use CLOROX, Windex or any other household cleaners. These chemicals will make the fabric sticky over time. Sun screen lotions may contain silicon that will also make PVC fabric sticky. Clean the boat tubes of any sun screen lotion marks to extend the boat fabric life cycle.
WE RECOMMEND 303 AEROSPACE PROTECTANT
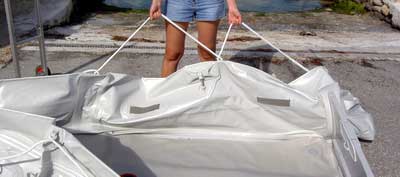
How to fold boat for compact storage?
Here are the step-by-step instructions for deflating and folding your boat.
How to protect air floors from accidental punctures or sharp dog claws?
An air floor PVC material has been designed to be strong and puncture-resistant. But if enough pressure is applied with a sharp object, like a knife or fishing hook for example, then a puncture may sometime occur. Dog claws, in general, are not sharp enough to puncture an air floor. But small pieces of sharp broken glass or similar objects may stick to the insole of shoes while boarding the dinghy and may also cut the surface of air floors in some cases.
To avoid damage to the high-pressure air floor, and keep it as good as new, you can purchase a piece of vinyl floor covering in a hardware store, or just use regular carpeting. Cut the vinyl or carpet to fit the inside of the boat and over the floor. Use paper patterns first, to get a perfect fit. Then use this paper pattern to cut the new flooring.
Applying vinyl or carpet covering will make inflatable air floors virtually indestructible. Floor vinyl covering or carpet is flexible and may be rolled up for storage when boat is deflated.
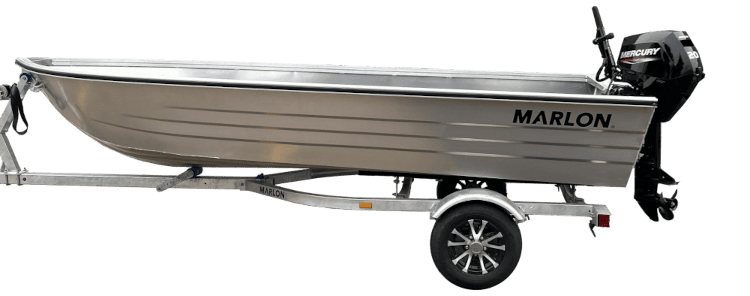
How can I prevent the outboard motor from damaging the transom while transporting my boat on a trailer?
While transporting inflatable boats on a trailer with the outboard motor in a raised position, heavy outboard engines may provide extra strain on a boat’s transom. When a moving trailer hits a bump or uneven pavement, heavy motors are capable of damaging the transom. You can install a pole support from the end of the trailer to the end of the outboard motor in order to provide extra support for the motor’s weight. These supports are available at places that sell trailers for boats and/or on-line.
Can I inflate my boat using an electric pump only?
No. You will need to use a hand pump to provide proper air pressure to the tubes. Electric pumps will not provide enough air pressure and your boat will not operate to it’s full performance. You may quickly inflate all air compartments with an electric pump, up to the point where no more air can be electrically pumped inside, or about 90%. Then, you will need to use a hand pump until the tubes, keel and bow are hard to the touch.
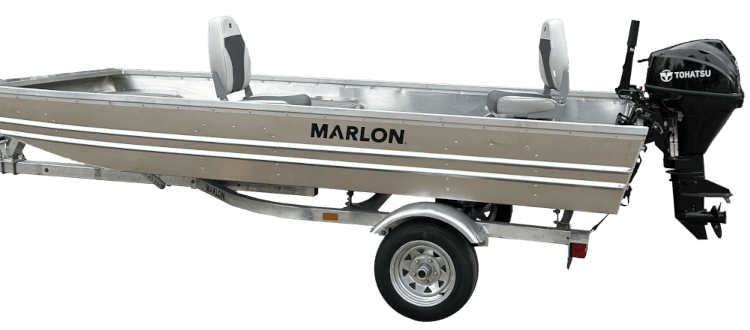
What type of outboard motor can be installed on an inflatable boat?
Short shaft 15″ outboard motors are recommended to be installed on the 15″ transom of an inflatable boats. The lighter the outboard motor – the better. Either 2-stroke or 4-stroke engines may be installed on a boat transom, however 2-stroke engines are generally much lighter then 4-stroke outboard motors.
Long shaft 20″ motors are not recommended, but may also be installed if a short shaft o/b is unavailable. However a long shaft o/b may create extra underwater drag. Long shaft o/b may be raised a few inches with the help of a 2-3″ wooden bar placed on top of the boat’s transom.
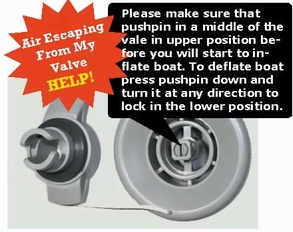
Air starts escaping from the valve immediately after I remove air pump. My boat starts loosing air after few hours. What is wrong?
The valve has a special pushpin inside. This pushpin has two positions, both up and down. When it is pressed in the down position, air will escape. If you turn the pushpin in any direction it will pop up. This will lock air inside and prevent it from escaping through the valve. Before inserting the air pump tube into the valve, please make sure that the pushpin is in the upper, popped up position. Once the pin is in the “popped up” position, insert the air pump tube into the valve and inflate the boat until it becomes hard. Once you remove the air pump, air will seal the valve and will no longer escape. If you would like to deflate the boat later on, press down on the pushpin and turn it in any direction until it stays in the pressed down position. Air will immediately escape from the tubes thru the valve.
What does “maximum motor capacity mean”? What motor rating do I need to put the boat on plane?
Max O/B Motor means: the maximum power outboard motor that can be safely used to plane a boat loaded to the maximum capacity on normal water surface conditions. Please exercise common sense and caution when using maximum motor capacities. Do not jump from wave to wave as new 4-stroke motors are much heavier then 2-strokes and provide extra strain on the transom.
Under normal circumstances, with half of a maximum persons/load capacity, or about 50% of the maximum O/B power rating may be necessary to put the boat on plane.
The lighter the motor, the faster boat will run. 2-stroke engines, while still possible to find, are much lighter then 4-strokes, and will provide same power at less strain to the transom.
What are the necessary steps to correctly assemble inflatable boat?
These are the steps you should follow to correctly inflate the boat:
Steps for assembly inflatable boat with an air floor:
1. Inflate all tubes to approximately 75% full.
2. Insert boat seats in designated spots.
3. Place deflated air floor inside the boat. The grey plywood board should be facing the keel. Make sure that the valve of the keel is accessible through the hole in the air floor. You will need it later to inflate the keel through this hole.
4. Place both ends of plywood boards under the left and right sides of tubes.
5. Stretch the air floor along the boats bottom, so it covers it from nose to transom. The rear end of the air floor should be touching the transom.
6. Inflate the air floor until it’s hard. You will know that the floor is fully inflated when the air pressure starts pushing the air pump handle up.
7. Inflate all tubes 100% until hard to touch.
8. Inflate the keel through the hole in air floor.

What is the working air pressure, and do I need a pressure gauge?
It is not necessary to have an air pressure gauge to inflate boats. The boat tubes are equipped with Safety valves that will prevent over-inflation. In general, when you feel that boat tubes/floor are hard to the touch, and it becomes difficult to pump any more air in, that means that the boat is ready.
However, if you are using a high-pressure electric air pump, please use below guidelines to avoid boat over-inflation and consequential damage.
Helpful conversion factors:
* 1 psi = 0.06895 bar
* 1 bar = 14.50326 psi
* 1 kpa = 0.145 psi
The keel tube under the floor is skewed to one side. How do I correct that?
Please follow these steps to correct positioning of the keel.
1. Deflate boat tubes.
2. Deflate and remove air floor.
3. Inflate keel and then deflate it while spreading it out evenly on both sides.
4. Insert air floor back and inflate boat tubes 100%.
5. Inflate air floor, then inflate keel.
I can’t put the boat on a plane due to cavitation problems. The outboard creates a lot of noise and bubbles but the prop lifts out of the water and the boat stops. Why?
There are two reasons for cavitation problems. First, is an incorrect or damaged prop. The second, and most likely, is that the boat is not fully or properly inflated. If the boat’s chambers are not fully inflated, this will cause water disturbance under the boat tubes, and cavitations as a result. Please make sure that the boat is fully inflated by using hand pump. Do not use only electric pumps or compressors to inflate the boat. Use a hand air pump to pump up all boat chambers until they are hard to the touch. In general, once you feel that it becomes difficult to pump any more air with a hand pump, it means that the chamber is full. You can lightly knock with your hand on each compartment and it should feel hard, not soft.
More Info about Cavitation due to the outboard propeller:
Ventilation occurs when surface air or exhaust gases are drawn into the propeller blades. The load on the propeller is reduced by the mixing of air or exhaust into the water steam causing over revving.
Anti-ventilation Plate: A large plate cast into gear case housing directly above propeller. Helps reduce surface air from being pulled into the blades.
Cavitation: The aeration (bubbling) and boiling effect of water caused by creation of a low pressure area. Generally caused by a solid shape (propeller blade) passing through the water, in such a position and speed, that a low pressure area is formed due to the inability to move through the water in nonresistant manner. An example is, a propeller blade that has a rough edge would not cut efficiently through the water, thus creating a low pressure area. If the pressure drops below the vapor pressure, a cavitation bubble will form in that region. These bubbles will collapse when they reach the higher pressure region of the blade. This causes a rapid change in pressure and can result in physical erosion. You may notice burns (erosion) at some area on the face of the blade.
How can you avoid slipping in the boat seat while the boat is in motion?
You can apply a non-slip stair tread tape which is manufactured by 3M. It is very durable and is water resistant as well. It is available in most hardware stores. It is made to be used on stairs but also works well on boat seats to keep you from slipping into turns when a boat is in motion. It makes the seats non-slip!
What to do if water slowly leaking into the boat?
Most likely place where water can enter inflatable boat is a one-way drain valve. There are several reasons why water may sip into the boat, and fixes are usually quick and easy.
1. Drain plug is not fully inserted. Please make sure there are no debris on a plug, and press on drain plug to make sure it is all way in.
2. One-way rubber seal that lock the valve is dirty, or there are debris under the seal. Pull rubber seal with your finger and inspect for debris stack between seal and plastic housing. Wipe rubber seal with an acetone.
3. Drain plug assembly got loose or not enough sealant under the drain valve. Tighten screws on a drain plug while avoiding cracking plastic part. Apply door/window clear silicone sealant around drain valve assembly. Replacement drain plug assemblies are also available per request.

I am a heavy person, over 250 lbs. How can I minimize pressure on the plywood seat and seating straps in order to avoid excessive wear?
Put a regular cooler between the seat and air or plywood floor to create extra support for the plywood seat. The cooler has to fit under the seat. There are IGLOO or Coleman coolers available in department stores that are just the right size.
Coolers can also serve as dry storage containers. When a boat is jumping on waves, coolers will prevent excessive pressure on the strips that hold the plywood seat attached to the tubes. For example, a Coleman 9 Qt. Excursion, Red cooler, dimensions 11.25″ x 12.66″ x 9.75″, Vendor Part Number: 6209A703G, around $15.